Showing posts with label projects for a toddler. Show all posts

Tuesday, 29 January 2013

More balloon balls

T's balloon ball has been quite popular with some visiting kids, so I decided to make some as gifts. My pentagon pattern worked quite well, but has to be hand sewed. I wasn't feeling that generous with my time so as to want to make too many more like that!

So I went back to some of the blogs where I had seen different balloon ball patterns, and gave three different ones a try. I made four balls from three different patterns.

As a disclaimer, I was being quick and slapdash about this project. I had a deadline, not a lot of free time, and needed to get them done. I didn't spend a lot of time getting my seam allowances accurate and lining up all the corners. Obviously, all these patterns will make nicer balls if you pay more attention than I did to what you're doing!

Warning: Always supervise small children playing with balloons, even if they are tucked into fabric balls, due to the risk of choking if they get any of the rubber in their mouths.

1. First there's this one from Stuff by Steph.


It has eight sides and an octagonal end piece. According to the pattern, you should put a buttonhole in one end piece, I just left one small side seam open. This did leave an opening that was visible, so you need to be really careful to tuck in the balloon end, so the child can't get at it.

This pattern was really fiddly. The end pieces are really small and the seams joining them to the sides are hard to get into. I had to hand-sew on the end pieces. But it made quite a nice little ball.

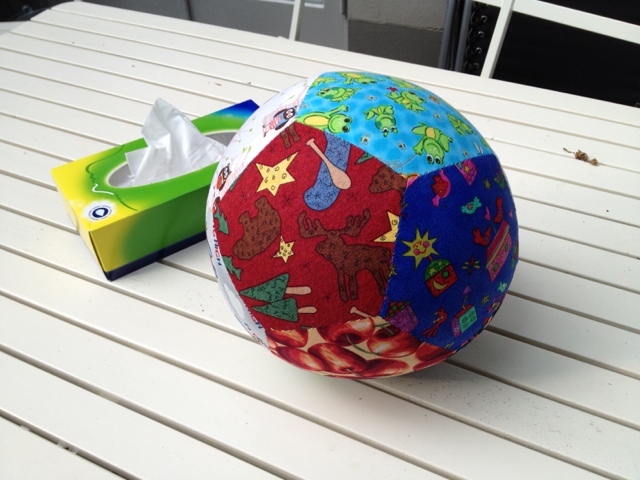
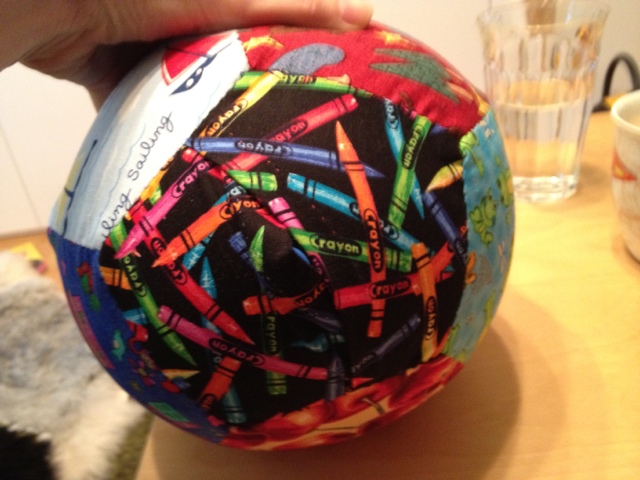
2. Next was this pattern from Purlbee.

I made two balls from this pattern, in slightly different sizes. (Sorry - I don't remember which of her "sizes" I picked, and in any case, I adjusted the size on my printer, so they don't match any of her sizes exactly).

This pattern was easier than the first, above, because I could machine sew all my seams. Not being particularly careful on this day, the ends don't quite meet up. This is sloppy sewing on my part, not the fault of the pattern. Especially because the pattern provides for covering the ends with small circles, which I didn't do (leaving my faults open for the world to see...). 

To make an entry point for the balloons, I made one side piece out of two, overlapping pieces, with small turn-under seams. (See the second picture of the ball with pink on it). I didn't get this quite right, so the opening gapes a little. Again - you need to be careful to tuck in the balloon carefully so the child doesn't pull it out.


3. The last was this pattern from Emma Jones.

This is a five-sided ball, with pentagon ends. I machine sewed the lot, which was interesting around the pentagons.

Again - being in a hurry, I was not very careful with my seam allowances. This ball showed my hap-hazardness most. Between wonky pentagons on the ends, and balloons that blow up pear-shaped not really round, this was one odd-shaped ball! But hopefully the recipient doesn't mind too much.


So. There were some extras for my nieces and nephews for christmas, light-weight, non-breakable and therefore cheap and easy to post. I haven't actually had any feedback, so I'm taking it that no news is good news!

Daycare fabric box and bag

Daycare fabric box and bag


(Note: I drafted this post back in September [2012]. Everything but putting the pictures into the right places. And then went back to work. And it has been sitting here in draft form ever since... But here it is, a little out of date with it's time references, but here nevertheless).

My little boy has just started daycare, and all the children have a shelf to keep their spare clothes and other bits and pieces on. I wanted to make him a fabric box that was personalised, and would keep all his things together (as much as possible...).

Being me, this supposedly simple project got more and more complicated as time went on. Having bought the wrong size zip, I decided to use that to make an expandable bag, matching the box, to carry the things we need to take back and forth each day. Somewhere to put all the things that "we need to remember to take to daycare tomorrow". And that project went from simple to complicated, in the way that things do...

Anyway, I finally finished them! Just in time as I have to go back to work on Monday. Not sure how I feel about that, these months of maternity leave have been lovely.

I was going to note how I made these, and maybe put up a tutorial for others. For the box, all I can say to anyone else who wants to make one like this is: DON'T! Or at least not the way I did. It was really fiddly and much more complicated that I had imagined. I'm really happy with the result, but I won't be making another any time soon! For the bag... the progress photos didn't happen, and I'm not sure I can be bothered writing up all the directions. If a few people ask for it I might reconsider, but in the meantime, they are finished to be admired. :)  [NOTE January 2013: It's been so long now, I don't think I can remember how I made it. So no tutorial will be available I'm afraid.]

Here is the box. It is fully fabric lined, and the original (unphotoshopped) version has my son's name appliqued on the lid. At least the short form, his whole name has too many letters!


Here is the bag. All zipped up it looks like this:


Inside it looks like this, with one inside zip pocket.


And the probably-totally-unnecessary-added-complication element is that if you unzip around the three outer sides, it expands to a bigger bag!


One daycare storage box, and one back-and-forth bag.


Monday, 11 June 2012

Balloon Ball from Pentagons

I finished my balloon ball from this post, and it's a big hit in our house with both big and little kids!


How to make this:

  1. Print 12 pentagons on normal printer paper and cut them out.
    1. You can make pentagons in Microsoft Word. It is under Insert --> Picture --> Autoshapes.
    2. Figure out how big you want your ball to be, and divide that measurement by 2.6. That will be the length of each side on your pentagons. Times this by 1.6 to find the width of your whole pentagon. (My pentagons were about 8.5cm along each side, 13.25cm wide, and my finished ball is about 22cm across.)
    3. Insert a pentagon and then make the pentagon as wide as the width you calculated above. Let Microsoft Word adjust the height proportionally.
  2. For eleven of the pentagons, place the paper on your fabric and cut roughly 1 - 1 1/2 cm outside the paper piece. (I used my roller cutter.)
  3. For each of these 11 pieces, place a paper pentagon against the wrong side of the fabric, and carefully fold the fabric seam allowance over the paper, making a sharp fold and keeping the fabric quite tight against the paper. Using a contrast colour thread, being careful to keep the paper centred in the fabric, hand baste (sew with big running stitches) about 5mm in from the edge, around all five sides. Now you should have eleven pentagons of fabric the same size as your paper pieces, with paper still inside.
  4. For the twelth pentagon, you need two pieces of fabric, each the full width of the pentagon plus seam allowances and about 2/3 the height of the pentagon plus seam allowances. In my case, with pentagons about 13.25cm wide, I needed two pieces each about 15.5 cm x 11cm. Take one long edge of each piece and turn about 1cm towards the wrong side, then fold over again; making a hem roughly 1cm wide. Sew along the hem. I hand sewed this with small running stitch, but you could just as easily machine sew it.
  5. Lay your two hemmed pieces of fabric right sides down next to each other, hem-to-hem, then overlap the two hemmed edges by about 3 cm, maybe a little less. Sew two seams at right-angles to the hemmed edges, joining the two overlapping pieces, from hem to hem, about 4-5 cm apart.
  6. Set your last paper pentagon over the two overlapping fabrics and pin, then baste as you did with the other eleven, folding the seam allowance around the paper.
  7. You should now have twelve fabric pentagons with paper sewn in.
  8. Load up a needle and thread with a matching thread. I used a variegated thread with my multi-coloured fabric, but anything that's not going to clash too badly is fine. It's better to match your thread to darker colours rather than lighter, if you want it to blend as much as possible. I used doubled thread; if this ball breaks it will because the fabric gives out, not because my sewing does!
  9. Take two pentagons and place right sides together. Then sew a ladder stitch seam to join the two pentagons along one edge. (For a quick run through on some options for different stitches and some pictures showing what the stitches look like, see the Sometimes Crafter here.) I tied off my sewing at every corner. This is possibly not necessary, but I wanted it to be easy to mend, if any sewing did start to come undone.
  10. Continue joining your pentagons in this pattern:


    (image from Wikipedia)

    It should look something like this:

  11. Join all the edges together. You do not need to leave any gaps for turning. When you've finished, it should look something like this:
  12. Carefully draw out all your basting threads and remove the paper pieces.
  13. Turn it inside out, through the gap between your overlapping piece.
  14. (This is where I though I was finished, but I realised that the overlapped pentagon was too wide, and the opening too big. So I sewed the seams described in paragraph 5 above now.)
  15. And here you have the finished product!
  16. Insert a balloon through the opening (with the mouth piece still outside) and inflate. You can just twist the balloon and tuck the end into the fabric ball. This makes it easy to deflate again and reuse the balloon, but it won't stay up for long. Otherwise tie off the balloon properly and tuck the end away inside.
Voila! One lightweight, kid friendly, furniture friendly, ball!
    Note: while they are lightweight, these balloon balls still fly pretty well. Don't smash at people, expecting them to slowly float across the room like a normal balloon! Not that I speak from experience or anything...

    Now that's it done, I do have a few "if I knew then what I know now" points.

    • Firstly, the overlap is too big on this size pentagons, as I've said above. I only figured this out after the fact, so I've included instructions to make it a bit smaller before sewing up your overlapping pentagon. I didn't fix that until after I was otherwise finished.
    • This ball is quite big. I think my little man will appreciate one slightly smaller, so I'm planning on making him a smaller one, and any extras I ever make for gifts will be a bit smaller.
    • For my toddler, it's quite hard to grab this ball. So my next model for him will include some grab loops along a couple of the seams.
    • It seems this is a popular toy indoors and outdoors. So his next version will not be made from quilting cotton fabrics, but rather some upholstery fabric samples I have lying around. This will be an outside version.

    Wednesday, 7 March 2012

    More detail about my aeroplane activity centre

    This blog post refers to my previous post: Aeroplane activity centre

    I'm not going to make a full tutorial on how I made my aeroplane activity centre, but I thought I'd share some of my methods.

    Basically, to make one of these, you need to:
    1. Sew all activities to front piece.
    2. Sew side tightener and velcro for top straps to back piece.
    3. Sew front and back piece at side seams, catching in eyelets. Sew front to back along bottom seam, catching in all texture ribbons, elastic, carabiner hook and eye, pocket and ties for pocket contents.
    4. Sew velcro for fastener to one inside piece. Sew front and back inside pieces along side seams, catching in handle and fastener flap. Sew sides of the bottom seam, leaving a 15-20cm gap.
    5. With the main section right side out, and the inside section wrong side out, place the main section inside the inside section. Sew main front and back to inside front and back all around the top seam, catching in the top straps.
    6. Turn right way out. Sew a top stitch seam along the bottom of the inside, closing the opening you left before. Push the inside down inside the main section. Top stitch along the seam between the main section and the inside.
    Ta da! Simple right. Especially step one. But in case you need more detail than that...

    The whole thing is supposed to be a finished size of 45cm x 25cm. I tried to use 1.5cm seam allowances. The back piece is actually 49cm wide and the front 41cm, to make sure that the eyelets in the side seams are accessible.

    I made my activity centre in a lightweight denim. The one I found is actually a little stretchy, which worked fine. I made one HUGE mistake. I didn't prewash my fabric and set the dye. So my hands were blue the whole time I was working on it, and I hate to think what my LO will look like when he's had a chew on it. :( If you're making one of these, wash your fabric and make sure the colour won't run!!

    The front piece is backed by some heavy weight interfacing. The one I used is called "Vildona".

    The buttons on the left are sewn on using upholstery thread, and are tied off in the middle, so there are two separate threads that have to break before a button will come off.

    The buttons on a string are on beading wire, that is plastic coated metal. At each end, the wire is wound several times in a tight circle, and I machine sewed zigzag over four sides of the circle. The buttons covering the ends are sewn on the same as the "winding" buttons, upholstery thread tied off in the middle.

    The shapes on the velcro are stuffed with a couple of layers of polarfleece. I sewed the velcro loops on by machine, then I hand sewed each shape around the fleece, which was cut to the same shape. In hindsight, I would not use satin ribbon to attach these, as the velcro is catching on the ribbon and pulling out threads, which doesn't look nice.

    The frog is cut from a patterned fabric, with a plain backing. I cut a hole in the backing fabric, threaded in some elastic, and zigzagged over the opening to close the open edges and to attach the elastic. Then I hand sewed the frog to the backing (wrong sides together), turned right side out, and sewed the last opening closed. I quilted a little around the frog's head to hold front to back. The lily pad is hand sewed on. There is a button hole in the denim just above the lily pad, through which I threaded the elastic. The elastic is then drawn up behind the denim, and sewn about a centimetre from the top seam. You could probably just pin it, then sew it into the top seam if you wanted.

    The magnet square was the hardest. I tried several other methods and binned them before I settled on this one. I wanted to hold the magnet in the middle of the circle-on-a-string without using any glue or suchlike, as my baby still puts everything in his mouth. And sewing the magnet in through all the layers just looked very bumpy and messy when I tried it. There are probably many other, better ways to do this, but this is how I did it:

    (Extra note: It was challenging to sew the items I did after the magnet square, because the magnets held the work to the sewing machine table. So I suggest marking where your magnet square will go, then doing everything else, then sewing the magnet square on last).
    1. Cut 20 circles of interfacing the size of the circles you want. Mine interfacing was "Vilene 250", and my circles are about 4cm in diametre.
    2. Iron three circles to each colour fabric you want, leaving space between them for about 1cm seam allowance on each circle (ie 2cm space between each interfacing circle). Cut out three circles of each colour with seam allowance.
    3. Take two other interfacing circles and put a small flat (quite strong) magnet in the middle. Hand sew around the magnet to hold it in the middle of the circle.
    4. Take two of your coloured circles (I used two different colours- you can use just one if you want) and place a magnet in interfacing between them.
      1. If using different back and front colours, make sure you have colours 1-2, 2-3, 3-4, and 4-1.
      2. When placing in your magnets, make sure you have the poles facing the right way. You need the two colours of 1 and 3 to have one pole of the magnet, the two colours of 2 and 4 to have the other pole. Set up a "control magnet" that must not turn over, and make sure colours 1 and 3 stick to it, 2 and 4 are repelled by it. (If you have the same colour on both sides of your circles on a string, this is not important).
    5. Hand sew together, right sides out, folding in the seam allowance as you go. Use the interfacing you ironed to the fabric as your sewing guide. So the seam you are sewing has: front right side of coloured circle with interfacing ironed to it, 1 extra layer of interfacing sewn around magnet, folded in seam allowance for front coloured circle, folded in seam allowance for back coloured circle, second layer of interfacing sewn around magnet, and back coloured fabric with ironed on interfacing.
    6. Sew in string before you finish the circle.
    7. Do the same for three other circles.
    8. Cut a piece of white fabric for the main square that is the size of the square you want plus seam allowance - ie 10cm + 1.5 + 1.5.
    9. Cut a piece of fabric the same as the main activity centre (mine was denim) the size of the square you want. Mine was 10 x 10 cm.
    10. Cut two squares of double sided interfacing the size of your square (10x10 cm).
    11. Iron the interfacing to the white and denim squares, leaving on the backing paper on the denim, not the white.
    12. Figure out where the centre of your coloured circles will be, and lightly glue one magnet to each of the four points on the front of the denim square. If using two colours on each circle on a string, make sure that you have opposite poles on the magnets upwards. So as you go round the square, you have N-S-N-S. Check with one magnet that you hold the same way up the whole time. It should be attracted to two magnets at opposite corners, and repelled by the other two.
    13. Place the white square over the denim square and sew around each magnet.
    14. Tack in the seam allowance on the one circle you have left of each colour, so you have one circle of each colour in the right size. Iron to help hold the seam allowance in.
    15. Place one circle of each colour onto the white background square over the magnets. Use the circles-on-a-string that you have already sewn, and make sure that you sew the right colour over the right magnet. When colour 1 is placed over a magnet on the white square, you should be able to stick either of the circles-on-string with colour 1 upwards over that magnet. If it is repelled, put colour 2 on that magnet instead, and colour 1 next to it. You should have the colours 1-2-3-4 in order around the square, and each circle on a string should attach to two circles next to each other, on one way up and one the other way up. You're not sticking colour 1 face to face with colour 1, but colour 1 should be upwards and sticking over the circle that is colour 1 on the square. Remove your circles-on-a-string and sew the coloured circles to the white square. I tried not to catch in too much of the denim, but it doesn't really matter.
    16. If you haven't already done so, remove tacking from the circles, that was holding in the seam allowance.
    17. Take the backing paper off the interfacing on the back of the denim, and carefully iron the seam allowance of the white square around the denim, so that it is held down to the back of the denim. Fold in the corners that won't be stuck down, and iron them in place so they don't show at the front. This ironing also sticks together the white layer to the denim, where there are no magnets. Be careful not to get interfacing glue on your iron, nor to stick the whole thing to your iron with the magnets.
    18. Decide which way up you want your square on your activity centre. See which two colours are on each side, and pin the string for the circle-on-a-string with those two colours there. If the square has colours 3 and 4 on the upper edge, pin the circle with colours 3 and 4 where the centre of the top of the white square will be. Each string should be long enough that the circle is just too short to reach the magnets on the opposite side of the square. Take the square off, and sew the strings to the main activity centre fabric, making sure each is well attached.
    19. Place the square back on the activity centre front piece and zigzag all around the edge.
    Phew!

    The press stud butterfly and his flower and cloud are made from felt, attached with double sided interfacing and zigzag stitch. The butterfly is two layers of felt with Vildona and double sided interfacing in between, with embroidery thread for decoration and plaited into the string to hold him on. The press studs are sewn with upholstery thread and knotted between each corner, so if a thread breaks they still shouldn't come off.

    I think everything else is pretty self explanatory.

    Good luck!

    Aeroplane activity centre

    I'm travelling in a week or so with my son, who will just have turned one. Inspired by something I saw on Pinterest and followed back to a blog post by Jeanine at Serving Pink Lemonade, I decided to make him an aeroplane activity centre, to fit over the plane's tray table. More Pinterest browsing on "quiet books" and "busy books" gave me loads of inspiration for activities I could use.

    After many evenings of cutting, ironing, sewing, unpicking, resewing... It is finally finished!

    I'm really pleased with how it turned out.

    The activity centre folds into a little package with a handle.


    You undo the velcro fastener, open it up, and turn the whole thing inside out to reveal the toys.


    It should (hopefully!!!) fit over the tray on the plane seat. I made it a little wider than the measurements I found online, and fitted velcro straps that can be tightened on the back. The top straps should go over the back of the tray, and can fold over any excess if it's too tall.


    The side strap goes through the buckle and back, where it can be pulled in to hold the activity centre tight.


    The front is where everything is happening. ( I didn't put anything on the back, because I'm fairly sure I'll have to take it off to fold up the tray, it's way too thick to leave on and be able to "fasten the tray table in an upright position".)

    On the left, there's a row of buttons with a ribbon to wind around them.

    Next is a square of velcro fuzz, with four shapes to stick to it, a triangle, square, hexagon and star.

    Under the velcro square is a string of buttons to slide back and forth.

    In the middle is a frog on a lily pad.


    The frog is on elastic, if you pull him and let go, he jumps back into place.


    To the right is a square with four coloured circles each containing a magnet. There are four circles on strings that also have magnets, to match to the right colour. The circles on strings have a different colour on each side, and they can each reach two of the base circles.


    If you try to put it on the wrong one, you have the wrong pole of the magnet, and it won't sit in place. You need to put it on the other circle, or turn it over.


    Under the magnets is a plastic buckle.


    On the far right is a butterfly on a press stud, that can snap onto a leaf, a flower or a cloud.


    At the bottom of the tray is a zip. Sewn into the front seam are some cords of different texture, some rings on elastic, a carabiner and a loop to catch it on, and a pocket.


    Inside the pocket are a stuffed heart and a stuffed sun. The heart is on elastic and the sun on a ribbon.

    Along the side seams are small loops, so I can attach other toys on strings and carabiner hooks, if I want to.

    I'm also hoping this will fit onto the pram bumper, with the top straps, so he can use it there as well.

    That's it! I know a lot of this will be far beyond my LO yet, but I have no plans to make a new one of these any time soon!


    If you'd like more information about how I made this, take a look at my next blog post: More detail about my aeroplane activity centre.