Tuesday 29 January 2013

Baby carrier bag

Baby-Carrier Bag: Pattern/Tutorial

I've seen through the stats page for this blog that quite a few people seem to have found their way here through searching something like "baby carrier storage bag". I put into my review about my Onya carrier that one of the first things I did was make a bag for it, so I thought I'd write up how I made mine. It's very simple, but it works for us.

Ours has a draw string closing:


 And two handles, one on either end.


We just fold in the straps and the sides of the carrier, roll it up and stuff it into the bag.


To make a bag just like this, you will need:

One rectangle of fabric: 44 cm wide by 65 cm long. I used something in a light upholstery weight.
Webbing or ribbon: 2 pieces @ 24cm (could easily be replaced by tubes of the same fabric as the bag).
Cord or elastic: approximately 120 cm
One of these doodads, that is apparently called a "cord lock".

Thread, sewing machine, bodkin or safety pin.

Instructions:


  1. Fold your fabric in half, wrong sides together and right sides out, short end to short end (folding the long edge in half), so you have a shape 44 cm x 32,5cm. Sew a seam along each side, 1/2 cm from the edge. You should have a very basic pocket with a fold along the bottom and a seam on each side, right side out. Make sure the edges are neat: if frayed, trim them neatly.
  2. Turn it inside out, so it is now wrong side out. Make sure you push the seams out fully, so the fold on each side is right on the sewing line. Sew another seam along each edge, 1 1/2 cm from the edge.
  3. Take a look at one bottom corner. Using a pin, mark the fold along the bottom edge of your pocket 15 cm from the corner. Mark 15 cm up the side seam. Push those two pins together and pin carefully, lining up the side seam with the bottom fold. Push out the rest of the fabric to the sides, so you have a neat right angle with your seam splitting it in half. Mark 5 cm along the seam from the corner. If you have correctly matched the seam and the bottom fold, it should be 5cm from this point out to the edge of the fabric on either side. Sew along this 10cm seam, at right angles to the side seam.  Release all pins and marks. Do the same on the other corner. (You can find lots of pictures and better instructions for this point if you google "sew box corners").
  4. Fold one top edge in half, seam to seam so you find the middle, and mark with a pin. Unfold. Measure down approximately 1 1/2 cm from the edge at that mid point and mark this spot (tailor's pencil, small tacked thread in contrast colour, just pin it - you choose). Measure down another 1 1/2 cm and mark this point. Sew a button hole between the two points you just marked. So you have a button hole in the middle of one side, centred about 2 - 2 1/2 cm from the loose edge.
  5. Fold down the top of the bag all around. Fold first 1/2 cm, then fold again another 1 1/2 cm. Top stitch along the edge, a couple of mm from the edge. 
  6. Take a piece of webbing approximately 24cm long and fold in one end twice. In total, you are folding in about 4cm, so the first fold will be about 1,9cm and the second about 2,1cm. Pin. Fold the other end the same. Carefully pin the webbing along the side seam. The bottom end should sit around 1mm from the box corner seam. Lay the webbing flat against the side seam then pull the top end back towards the bottom of the bag a couple of mm, so that it has a little slack to fit your fingers under and doesn't sit too tight against the bag when it is stuffed full. Sew the webbing to the bag. I sewed a square around the folded end, and a cross across the middle of this square. Do the same on the other end with another piece of webbing.
  7. Thread your cord through the seam you sewed around the top of the bag, using a bodkin or safety pin. Enter and exit through the buttonhole. Thread your cord lock onto your cord, and tie big knots in the ends of your cord so the cord lock can't slide off.
You're finished!

As normal, I forgot or didn't think to take progress photos, so I hope these written instructions make sense. It sounds way more complicated than it actually was, written down like this. 

This is just the quick pattern I came up with in which to store our baby carrier, and it works for us. Obviously, many other bag patterns would work to shove a baby carrier in.


Reversible tote with tie handles

I put together this tote for a present for a friend in hospital. I filled it with bits and pieces that would hopefully be fun for someone who was bed-bound, and let the bag be the wrapping and present in one!

It has patch pockets on both sides, so one inside and one outside pocket. It is fully reversible, just pull it inside-out depending on which side you want to show.


I made the handles four individual straps, so it can be tied to anything to hold it up.

I'm really happy with how it turned out.

More balloon balls

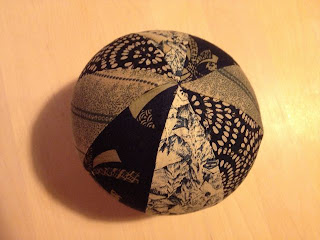
T's balloon ball has been quite popular with some visiting kids, so I decided to make some as gifts. My pentagon pattern worked quite well, but has to be hand sewed. I wasn't feeling that generous with my time so as to want to make too many more like that!

So I went back to some of the blogs where I had seen different balloon ball patterns, and gave three different ones a try. I made four balls from three different patterns.

As a disclaimer, I was being quick and slapdash about this project. I had a deadline, not a lot of free time, and needed to get them done. I didn't spend a lot of time getting my seam allowances accurate and lining up all the corners. Obviously, all these patterns will make nicer balls if you pay more attention than I did to what you're doing!

Warning: Always supervise small children playing with balloons, even if they are tucked into fabric balls, due to the risk of choking if they get any of the rubber in their mouths.

1. First there's this one from Stuff by Steph.


It has eight sides and an octagonal end piece. According to the pattern, you should put a buttonhole in one end piece, I just left one small side seam open. This did leave an opening that was visible, so you need to be really careful to tuck in the balloon end, so the child can't get at it.

This pattern was really fiddly. The end pieces are really small and the seams joining them to the sides are hard to get into. I had to hand-sew on the end pieces. But it made quite a nice little ball.

2. Next was this pattern from Purlbee.

I made two balls from this pattern, in slightly different sizes. (Sorry - I don't remember which of her "sizes" I picked, and in any case, I adjusted the size on my printer, so they don't match any of her sizes exactly).

This pattern was easier than the first, above, because I could machine sew all my seams. Not being particularly careful on this day, the ends don't quite meet up. This is sloppy sewing on my part, not the fault of the pattern. Especially because the pattern provides for covering the ends with small circles, which I didn't do (leaving my faults open for the world to see...). 

To make an entry point for the balloons, I made one side piece out of two, overlapping pieces, with small turn-under seams. (See the second picture of the ball with pink on it). I didn't get this quite right, so the opening gapes a little. Again - you need to be careful to tuck in the balloon carefully so the child doesn't pull it out.


3. The last was this pattern from Emma Jones.

This is a five-sided ball, with pentagon ends. I machine sewed the lot, which was interesting around the pentagons.

Again - being in a hurry, I was not very careful with my seam allowances. This ball showed my hap-hazardness most. Between wonky pentagons on the ends, and balloons that blow up pear-shaped not really round, this was one odd-shaped ball! But hopefully the recipient doesn't mind too much.


So. There were some extras for my nieces and nephews for christmas, light-weight, non-breakable and therefore cheap and easy to post. I haven't actually had any feedback, so I'm taking it that no news is good news!

Cupcakes and chatter

I had some of my mothers' group and their babies over for fika (one day, now quite a while ago...).

Fika is a Swedish word that is so good, I think it ought to be used in English too. It is pronounced sort of "fee-ka".

Noun: The word "Fika" can mean what you eat at snack time (morning tea, afternoon tea, late night snack). Traditionally fika is something sweet, a cinnamon bun or some biscuits (cookies for Americans). But a small bread roll could be fika, or any snack food, if that's what you eat when you take a break, or when you meet up with friends.

"Fika" can also refer to the act of sitting down with friends or colleagues for a break, or to catch up. In nearly all Swedish workplaces, everyone will stop and gather for coffee and maybe a snack once in the morning and once in the afternoon. To people coming from other working cultures, it can seem like a real interruption or waste of time, but a lot of social chatter often leads to work connections and more synchronisation of tasks and projects. you get used to it, and I'd miss it if I were to move away now.

Verb: You can also use the word "fika" as a verb as well. Let's fika! It's time to fika.


I made mini brownies with hazelnuts and dried apricots, and butterfly cakes with jam and cream. Yum!

Daycare fabric box and bag

Daycare fabric box and bag


(Note: I drafted this post back in September [2012]. Everything but putting the pictures into the right places. And then went back to work. And it has been sitting here in draft form ever since... But here it is, a little out of date with it's time references, but here nevertheless).

My little boy has just started daycare, and all the children have a shelf to keep their spare clothes and other bits and pieces on. I wanted to make him a fabric box that was personalised, and would keep all his things together (as much as possible...).

Being me, this supposedly simple project got more and more complicated as time went on. Having bought the wrong size zip, I decided to use that to make an expandable bag, matching the box, to carry the things we need to take back and forth each day. Somewhere to put all the things that "we need to remember to take to daycare tomorrow". And that project went from simple to complicated, in the way that things do...

Anyway, I finally finished them! Just in time as I have to go back to work on Monday. Not sure how I feel about that, these months of maternity leave have been lovely.

I was going to note how I made these, and maybe put up a tutorial for others. For the box, all I can say to anyone else who wants to make one like this is: DON'T! Or at least not the way I did. It was really fiddly and much more complicated that I had imagined. I'm really happy with the result, but I won't be making another any time soon! For the bag... the progress photos didn't happen, and I'm not sure I can be bothered writing up all the directions. If a few people ask for it I might reconsider, but in the meantime, they are finished to be admired. :)  [NOTE January 2013: It's been so long now, I don't think I can remember how I made it. So no tutorial will be available I'm afraid.]

Here is the box. It is fully fabric lined, and the original (unphotoshopped) version has my son's name appliqued on the lid. At least the short form, his whole name has too many letters!


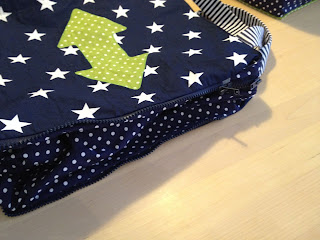
Here is the bag. All zipped up it looks like this:


Inside it looks like this, with one inside zip pocket.


And the probably-totally-unnecessary-added-complication element is that if you unzip around the three outer sides, it expands to a bigger bag!


One daycare storage box, and one back-and-forth bag.


My anything-and-everything-I-could-possibly-need bag

My "everybag"

I am the sort of person who likes to be organised. I like to think in advance, "what might I need with me today" and I pack the things I think I might need.

This has the unfortunate side effect that I cannot pack light. Time and time again I've tried, only to lug huge bags out the door. Occasionally it bugs me and I wish I could just take life as it comes. But mostly, I like being prepared and having with me the things I need, when I need them. (And yes, I am aware of the subjective nature of the word "need" in that sentence.)

Friends, colleagues and family regularly mock me for the random (they think) things that I pack and the size of my bags, only to find the widgets I have with me to be just what they need on arrival (or at least, my stuff makes their job/trip/day out much easier or more comfortable).

So I think, despite the dreary mockery, I'm going to go on planning what I might need with me, and continue failing to pack light.

Since about the age of 13, I've carried around a little bag with "stuff I might need". It's receptacle and contents list has morphed with my occupation, my age, my location and all the other elements that make up my life.

This is it's current incarnation:

It lives in a pencil case I bought at a stationers years ago. One side has a pen holder and some little pockets, the other is one bigger pocket.

In the flat pocket side, I carry around:
- a click-up pencil (or two)
- a blue, a red and a green ball point pen. (These are a hangover from my student days, when I used to take notes in different colours. I still do this at work. It's way easier to find my notes if I can remember, for example, that I wrote something about that on the top of a left hand page in green.)
- a good black pen (preferably something that dries fast on shiny surfaces like postcards or greeting cards)
- a black, fairly fine-tip permanent marker. (You can always use a permanent marker.)
- a highlighter. (Haven't actually used this for ages, but again, can come in handy when taking notes at work.)
- a nail file. Actually two. A metal/sapphire with pointy tip and a glass one with a nice filing surface.
- a small plastic ruler (hmm... seems to have vanished when I went to take the photos. Wonder who's borrowed that...)
- my phone earbuds
- two balloons. (I have a child and use balloon balls to keep him entertained every now and again.)

In the little side pockets here there are:
- pencil lead refills
- a white eraser
- a mini white-out tape roller
- post-it page markers in two sizes
- panty liners
- bandaids (sticky plasters)

Ok. Still with me? Take a deep breath... Here's what's in the main pocket:
- a small hairbrush
- some hairclips
- a hairband or three
- a mini tube of hand cream
- lip balm
- tiny tube of lip gloss
- mini tube of hand disinfectant and a couple of single wrap disinfectant wipes
- toothbrush (supposedly with travel cover if said cheap travel cover would stay on)
- a couple of sanitary pads
- small pack tissues
- useful tablets (painkillers, antacids) and some rehydration salt sachets
- a teaspoon
- a USB memory stick
- a mini s-carabiner
- a chocolate bar
- a little (old) vitamin container full of my favourite hot chocolate mix
- a few of these cable holders

It's probably time I gave it a go-through and left a few things at home. But you never know when you might need something!


There are some similar bags here that would also work well:

Easy-Classification-Pencil-Case

Flap-Type-Pencil-Case

Mega-Pencil-Case

(I have no idea if this is a reliable online shop - I found these bags through Google and have never used it).


And I have a soft spot for these bags, not so many pockets but lovely designs:
Ceannis cosmetic bags


Does anyone else feel the need to carry around all this paraphernalia?