Thursday, 29 March 2012

International I-Spy charm swap


I've seen a few swaps organised online for fabric squares to make an I-Spy quilt. I really want to make my son an I-Spy quilt, and I really don't want to buy the minimum cut of all the different fabrics I'll need! I haven't managed to find any swaps that are a) open now, or b) open to non-US residents, so I thought I'd organise my own.

UPDATE: Our swap is now full. I can't wait to see what everyone sends in!

If you are interested in doing an I-spy swap, post your email address in the comments field, or send me a private email. If we get enough people interested, I will organise another swap.

What's an I-Spy quilt?
An I-Spy quilt is a patchwork with many different fabrics showing many different objects. Kids can be given a list or small cards naming everything on the quilt. They then search the quilt to find the different items. They are great for keeping kids entertained: outdoors, in the car, or anywhere really.

What's this?
So here it is: an international swap for I-Spy charm squares (12,5 cm or 5 inch squares), open for sign up as of 1 April 2012. Fabric to be posted to arrive in Sweden no later than 15 May 2012. I'll get them all back in the post by 31 May. When you get it will depend on where you are.

Fabric
This swap is for I-Spy fabrics, that means small images of things that a child can name. Things like cats, strawberies, playing cards, ladybirds, dinosaurs, soccer balls, drums, frogs, pirates, dragonflies, boats, suitcases, fairies, zebras, buses, etc etc.

The images also need to be small enough that every square you send has the item in an identifiable form. It's no good sending a fabric that has a big image, so one square has the head, and the other squares all have abstract looking back legs. So please send small prints that look good on a charm square.

No solids, dots, or abstract patterns. Floral prints are no good, specific flowers are ok - such as "daisies" or "tulips" (but not too many so avoid if you can).

Please: no licensed images (sports teams, Disney characters, etc).

The fabrics should be good quality cotton patchwork fabric, new, unwashed, from a smoke-free home.

Format and number
Each fabric square you send in should be 12,5 cm (5 inches) square. Please be very careful when cutting to ensure that your pieces are this size. There are good instructions for cutting charm squares on Elizabeth Hartman's blog post here. You will need 16 charm squares from each of 5 fabrics. If you're really careful, you should be able to get that from 25 cm full width, or from a fat quarter. If in doubt, buy extra to be on the safe side!

So you send me 80 squares and you will get back 80 squares; 5 of which you sent, the other 75 new! (I know you ought to be able to keep your own fabrics, but then I have to keep track of who sent what, so it'll be way easier for me if you send me all 16 pieces, and you'll get back squares of the fabric you sent in as well.)
If you can group your fabric, that would be appreciated. Place one of each of your five fabrics in a small pile together, before bundling them all up to post to me.

Packaging and payment
Put all your charm squares into a small plastic bag (eg ziploc), together with a card showing your name, email address and postal address. Please type all names and addresses, no hand written cards! Post it to the address I will email to you with acceptance of your sign-up to the swap.

Then pay for your return postage into my Paypal account. Details will also be in your acceptance email.
UPDATE:Postage to addresses in Sweden will cost 50 SEK. Anywhere else in the world: 90 SEK (roughly 10.5 EUR or 13.5 USD.) This includes a padded envelope that I will buy. If you take more than one slot, you can get up to three sets of 80 charms into the same envelope, same postage cost.

Sign-up
This swap is now full, and it is not possible to sign up. If you are interested in doing an I-spy swap, post your email address in the comments field, or send me a private email. If we get enough people interested, I will organise another swap.

New baby change bag

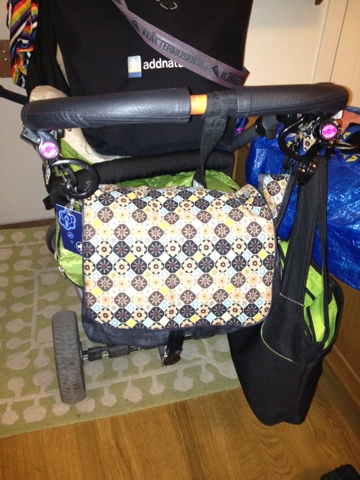
A few weeks ago I finished our new change bag. I think it is way nicer than anything I've seen available to buy.


I followed a pattern by Åsa Sandblad (in Swedish) that I bought at Tyger och Ting, where I also got the fabric; but of course since I'm incapable of just following a pattern, I adjusted it a bit.

My version is one and a half times as wide as the original, and has only three fabrics, instead of the suggested four.

The pattern doesn't specify how to make the internal pockets; I put in one zip pocket across the whole width on the back lining. I thought about (tried) a patch pocket inside the flap, but since I'm not capable of making a good looking patch pocket with no open edges inside, I gave up that idea.


I put a loop inside one side seam of the lining that I can hook my keys on, and a clip buckle to hold down the flap (as it's always overfull).


I also put in loops on the top seam outside the shoulder strap, and made extra straps to hold it to the pram handles.


When I was done I whipped up a couple of pouches for inside, with the fabric I had left over.


They've each got two zip pockets; I use one for nappy change things and the other has a change of clothes, some emergency toys and the pegs I use to hold blankets over the pram.


Overall I'm really happy with this new bag. It is a bit small to fit in everything I need to take with me. I can squeeze in a bit of food, but for a long day needing several meals and snacks, I need a separate bag for my LO's food.


And it's not remotely waterproof, which is really tempting fate. I wonder if there is any spray I can use to make it slightly more water repellent?

If I were to start again, knowing then what I know now, I would probably make it a smidgeon bigger, in all directions. I would definitely make the side pocket bigger, as that's too narrow for any sort of bottle, and not very useful as it is now. I would put the clip buckle in as I was making the flap/outer, instead of sewing it on after the fact, and I would put much more reinforcing in the loops that it hangs from on the pram. So far they're holding, but they are pretty thin and might not last as long as I hope they will.

So there you have it. Our one-of-a-kind change bag.


P.S. There's a picture of the original design on this blog post.

Wednesday, 7 March 2012

More detail about my aeroplane activity centre

This blog post refers to my previous post: Aeroplane activity centre

I'm not going to make a full tutorial on how I made my aeroplane activity centre, but I thought I'd share some of my methods.

Basically, to make one of these, you need to:
  1. Sew all activities to front piece.
  2. Sew side tightener and velcro for top straps to back piece.
  3. Sew front and back piece at side seams, catching in eyelets. Sew front to back along bottom seam, catching in all texture ribbons, elastic, carabiner hook and eye, pocket and ties for pocket contents.
  4. Sew velcro for fastener to one inside piece. Sew front and back inside pieces along side seams, catching in handle and fastener flap. Sew sides of the bottom seam, leaving a 15-20cm gap.
  5. With the main section right side out, and the inside section wrong side out, place the main section inside the inside section. Sew main front and back to inside front and back all around the top seam, catching in the top straps.
  6. Turn right way out. Sew a top stitch seam along the bottom of the inside, closing the opening you left before. Push the inside down inside the main section. Top stitch along the seam between the main section and the inside.
Ta da! Simple right. Especially step one. But in case you need more detail than that...

The whole thing is supposed to be a finished size of 45cm x 25cm. I tried to use 1.5cm seam allowances. The back piece is actually 49cm wide and the front 41cm, to make sure that the eyelets in the side seams are accessible.

I made my activity centre in a lightweight denim. The one I found is actually a little stretchy, which worked fine. I made one HUGE mistake. I didn't prewash my fabric and set the dye. So my hands were blue the whole time I was working on it, and I hate to think what my LO will look like when he's had a chew on it. :( If you're making one of these, wash your fabric and make sure the colour won't run!!

The front piece is backed by some heavy weight interfacing. The one I used is called "Vildona".

The buttons on the left are sewn on using upholstery thread, and are tied off in the middle, so there are two separate threads that have to break before a button will come off.

The buttons on a string are on beading wire, that is plastic coated metal. At each end, the wire is wound several times in a tight circle, and I machine sewed zigzag over four sides of the circle. The buttons covering the ends are sewn on the same as the "winding" buttons, upholstery thread tied off in the middle.

The shapes on the velcro are stuffed with a couple of layers of polarfleece. I sewed the velcro loops on by machine, then I hand sewed each shape around the fleece, which was cut to the same shape. In hindsight, I would not use satin ribbon to attach these, as the velcro is catching on the ribbon and pulling out threads, which doesn't look nice.

The frog is cut from a patterned fabric, with a plain backing. I cut a hole in the backing fabric, threaded in some elastic, and zigzagged over the opening to close the open edges and to attach the elastic. Then I hand sewed the frog to the backing (wrong sides together), turned right side out, and sewed the last opening closed. I quilted a little around the frog's head to hold front to back. The lily pad is hand sewed on. There is a button hole in the denim just above the lily pad, through which I threaded the elastic. The elastic is then drawn up behind the denim, and sewn about a centimetre from the top seam. You could probably just pin it, then sew it into the top seam if you wanted.

The magnet square was the hardest. I tried several other methods and binned them before I settled on this one. I wanted to hold the magnet in the middle of the circle-on-a-string without using any glue or suchlike, as my baby still puts everything in his mouth. And sewing the magnet in through all the layers just looked very bumpy and messy when I tried it. There are probably many other, better ways to do this, but this is how I did it:

(Extra note: It was challenging to sew the items I did after the magnet square, because the magnets held the work to the sewing machine table. So I suggest marking where your magnet square will go, then doing everything else, then sewing the magnet square on last).
  1. Cut 20 circles of interfacing the size of the circles you want. Mine interfacing was "Vilene 250", and my circles are about 4cm in diametre.
  2. Iron three circles to each colour fabric you want, leaving space between them for about 1cm seam allowance on each circle (ie 2cm space between each interfacing circle). Cut out three circles of each colour with seam allowance.
  3. Take two other interfacing circles and put a small flat (quite strong) magnet in the middle. Hand sew around the magnet to hold it in the middle of the circle.
  4. Take two of your coloured circles (I used two different colours- you can use just one if you want) and place a magnet in interfacing between them.
    1. If using different back and front colours, make sure you have colours 1-2, 2-3, 3-4, and 4-1.
    2. When placing in your magnets, make sure you have the poles facing the right way. You need the two colours of 1 and 3 to have one pole of the magnet, the two colours of 2 and 4 to have the other pole. Set up a "control magnet" that must not turn over, and make sure colours 1 and 3 stick to it, 2 and 4 are repelled by it. (If you have the same colour on both sides of your circles on a string, this is not important).
  5. Hand sew together, right sides out, folding in the seam allowance as you go. Use the interfacing you ironed to the fabric as your sewing guide. So the seam you are sewing has: front right side of coloured circle with interfacing ironed to it, 1 extra layer of interfacing sewn around magnet, folded in seam allowance for front coloured circle, folded in seam allowance for back coloured circle, second layer of interfacing sewn around magnet, and back coloured fabric with ironed on interfacing.
  6. Sew in string before you finish the circle.
  7. Do the same for three other circles.
  8. Cut a piece of white fabric for the main square that is the size of the square you want plus seam allowance - ie 10cm + 1.5 + 1.5.
  9. Cut a piece of fabric the same as the main activity centre (mine was denim) the size of the square you want. Mine was 10 x 10 cm.
  10. Cut two squares of double sided interfacing the size of your square (10x10 cm).
  11. Iron the interfacing to the white and denim squares, leaving on the backing paper on the denim, not the white.
  12. Figure out where the centre of your coloured circles will be, and lightly glue one magnet to each of the four points on the front of the denim square. If using two colours on each circle on a string, make sure that you have opposite poles on the magnets upwards. So as you go round the square, you have N-S-N-S. Check with one magnet that you hold the same way up the whole time. It should be attracted to two magnets at opposite corners, and repelled by the other two.
  13. Place the white square over the denim square and sew around each magnet.
  14. Tack in the seam allowance on the one circle you have left of each colour, so you have one circle of each colour in the right size. Iron to help hold the seam allowance in.
  15. Place one circle of each colour onto the white background square over the magnets. Use the circles-on-a-string that you have already sewn, and make sure that you sew the right colour over the right magnet. When colour 1 is placed over a magnet on the white square, you should be able to stick either of the circles-on-string with colour 1 upwards over that magnet. If it is repelled, put colour 2 on that magnet instead, and colour 1 next to it. You should have the colours 1-2-3-4 in order around the square, and each circle on a string should attach to two circles next to each other, on one way up and one the other way up. You're not sticking colour 1 face to face with colour 1, but colour 1 should be upwards and sticking over the circle that is colour 1 on the square. Remove your circles-on-a-string and sew the coloured circles to the white square. I tried not to catch in too much of the denim, but it doesn't really matter.
  16. If you haven't already done so, remove tacking from the circles, that was holding in the seam allowance.
  17. Take the backing paper off the interfacing on the back of the denim, and carefully iron the seam allowance of the white square around the denim, so that it is held down to the back of the denim. Fold in the corners that won't be stuck down, and iron them in place so they don't show at the front. This ironing also sticks together the white layer to the denim, where there are no magnets. Be careful not to get interfacing glue on your iron, nor to stick the whole thing to your iron with the magnets.
  18. Decide which way up you want your square on your activity centre. See which two colours are on each side, and pin the string for the circle-on-a-string with those two colours there. If the square has colours 3 and 4 on the upper edge, pin the circle with colours 3 and 4 where the centre of the top of the white square will be. Each string should be long enough that the circle is just too short to reach the magnets on the opposite side of the square. Take the square off, and sew the strings to the main activity centre fabric, making sure each is well attached.
  19. Place the square back on the activity centre front piece and zigzag all around the edge.
Phew!

The press stud butterfly and his flower and cloud are made from felt, attached with double sided interfacing and zigzag stitch. The butterfly is two layers of felt with Vildona and double sided interfacing in between, with embroidery thread for decoration and plaited into the string to hold him on. The press studs are sewn with upholstery thread and knotted between each corner, so if a thread breaks they still shouldn't come off.

I think everything else is pretty self explanatory.

Good luck!

Aeroplane activity centre

I'm travelling in a week or so with my son, who will just have turned one. Inspired by something I saw on Pinterest and followed back to a blog post by Jeanine at Serving Pink Lemonade, I decided to make him an aeroplane activity centre, to fit over the plane's tray table. More Pinterest browsing on "quiet books" and "busy books" gave me loads of inspiration for activities I could use.

After many evenings of cutting, ironing, sewing, unpicking, resewing... It is finally finished!

I'm really pleased with how it turned out.

The activity centre folds into a little package with a handle.


You undo the velcro fastener, open it up, and turn the whole thing inside out to reveal the toys.


It should (hopefully!!!) fit over the tray on the plane seat. I made it a little wider than the measurements I found online, and fitted velcro straps that can be tightened on the back. The top straps should go over the back of the tray, and can fold over any excess if it's too tall.


The side strap goes through the buckle and back, where it can be pulled in to hold the activity centre tight.


The front is where everything is happening. ( I didn't put anything on the back, because I'm fairly sure I'll have to take it off to fold up the tray, it's way too thick to leave on and be able to "fasten the tray table in an upright position".)

On the left, there's a row of buttons with a ribbon to wind around them.

Next is a square of velcro fuzz, with four shapes to stick to it, a triangle, square, hexagon and star.

Under the velcro square is a string of buttons to slide back and forth.

In the middle is a frog on a lily pad.


The frog is on elastic, if you pull him and let go, he jumps back into place.


To the right is a square with four coloured circles each containing a magnet. There are four circles on strings that also have magnets, to match to the right colour. The circles on strings have a different colour on each side, and they can each reach two of the base circles.


If you try to put it on the wrong one, you have the wrong pole of the magnet, and it won't sit in place. You need to put it on the other circle, or turn it over.


Under the magnets is a plastic buckle.


On the far right is a butterfly on a press stud, that can snap onto a leaf, a flower or a cloud.


At the bottom of the tray is a zip. Sewn into the front seam are some cords of different texture, some rings on elastic, a carabiner and a loop to catch it on, and a pocket.


Inside the pocket are a stuffed heart and a stuffed sun. The heart is on elastic and the sun on a ribbon.

Along the side seams are small loops, so I can attach other toys on strings and carabiner hooks, if I want to.

I'm also hoping this will fit onto the pram bumper, with the top straps, so he can use it there as well.

That's it! I know a lot of this will be far beyond my LO yet, but I have no plans to make a new one of these any time soon!


If you'd like more information about how I made this, take a look at my next blog post: More detail about my aeroplane activity centre.


Who am I?

Hi there!

I am an Aussie living with my wonderful Swedish husband in Sweden. We have one son, who was born in March 2011.

I am a sporadic crafter, who likes trying all sorts of new things. I can sew, knit, crochet, do decoupage, beading, needle felting, ... ...

I tend to get into something, then leave it for ages. I suspect my blogging will be the same. But here are a couple of posts at least, to share what I've been up to recently.

Hope you enjoy reading this!
Helen