Showing posts with label sewing projects. Show all posts

Tuesday, 29 January 2013

Baby carrier bag

Baby-Carrier Bag: Pattern/Tutorial

I've seen through the stats page for this blog that quite a few people seem to have found their way here through searching something like "baby carrier storage bag". I put into my review about my Onya carrier that one of the first things I did was make a bag for it, so I thought I'd write up how I made mine. It's very simple, but it works for us.

Ours has a draw string closing:


 And two handles, one on either end.


We just fold in the straps and the sides of the carrier, roll it up and stuff it into the bag.


To make a bag just like this, you will need:

One rectangle of fabric: 44 cm wide by 65 cm long. I used something in a light upholstery weight.
Webbing or ribbon: 2 pieces @ 24cm (could easily be replaced by tubes of the same fabric as the bag).
Cord or elastic: approximately 120 cm
One of these doodads, that is apparently called a "cord lock".

Thread, sewing machine, bodkin or safety pin.

Instructions:


  1. Fold your fabric in half, wrong sides together and right sides out, short end to short end (folding the long edge in half), so you have a shape 44 cm x 32,5cm. Sew a seam along each side, 1/2 cm from the edge. You should have a very basic pocket with a fold along the bottom and a seam on each side, right side out. Make sure the edges are neat: if frayed, trim them neatly.
  2. Turn it inside out, so it is now wrong side out. Make sure you push the seams out fully, so the fold on each side is right on the sewing line. Sew another seam along each edge, 1 1/2 cm from the edge.
  3. Take a look at one bottom corner. Using a pin, mark the fold along the bottom edge of your pocket 15 cm from the corner. Mark 15 cm up the side seam. Push those two pins together and pin carefully, lining up the side seam with the bottom fold. Push out the rest of the fabric to the sides, so you have a neat right angle with your seam splitting it in half. Mark 5 cm along the seam from the corner. If you have correctly matched the seam and the bottom fold, it should be 5cm from this point out to the edge of the fabric on either side. Sew along this 10cm seam, at right angles to the side seam.  Release all pins and marks. Do the same on the other corner. (You can find lots of pictures and better instructions for this point if you google "sew box corners").
  4. Fold one top edge in half, seam to seam so you find the middle, and mark with a pin. Unfold. Measure down approximately 1 1/2 cm from the edge at that mid point and mark this spot (tailor's pencil, small tacked thread in contrast colour, just pin it - you choose). Measure down another 1 1/2 cm and mark this point. Sew a button hole between the two points you just marked. So you have a button hole in the middle of one side, centred about 2 - 2 1/2 cm from the loose edge.
  5. Fold down the top of the bag all around. Fold first 1/2 cm, then fold again another 1 1/2 cm. Top stitch along the edge, a couple of mm from the edge. 
  6. Take a piece of webbing approximately 24cm long and fold in one end twice. In total, you are folding in about 4cm, so the first fold will be about 1,9cm and the second about 2,1cm. Pin. Fold the other end the same. Carefully pin the webbing along the side seam. The bottom end should sit around 1mm from the box corner seam. Lay the webbing flat against the side seam then pull the top end back towards the bottom of the bag a couple of mm, so that it has a little slack to fit your fingers under and doesn't sit too tight against the bag when it is stuffed full. Sew the webbing to the bag. I sewed a square around the folded end, and a cross across the middle of this square. Do the same on the other end with another piece of webbing.
  7. Thread your cord through the seam you sewed around the top of the bag, using a bodkin or safety pin. Enter and exit through the buttonhole. Thread your cord lock onto your cord, and tie big knots in the ends of your cord so the cord lock can't slide off.
You're finished!

As normal, I forgot or didn't think to take progress photos, so I hope these written instructions make sense. It sounds way more complicated than it actually was, written down like this. 

This is just the quick pattern I came up with in which to store our baby carrier, and it works for us. Obviously, many other bag patterns would work to shove a baby carrier in.


Reversible tote with tie handles

I put together this tote for a present for a friend in hospital. I filled it with bits and pieces that would hopefully be fun for someone who was bed-bound, and let the bag be the wrapping and present in one!

It has patch pockets on both sides, so one inside and one outside pocket. It is fully reversible, just pull it inside-out depending on which side you want to show.


I made the handles four individual straps, so it can be tied to anything to hold it up.

I'm really happy with how it turned out.

More balloon balls

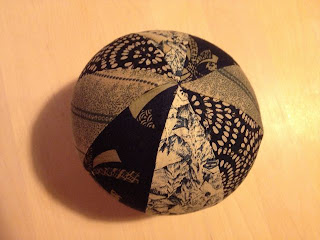
T's balloon ball has been quite popular with some visiting kids, so I decided to make some as gifts. My pentagon pattern worked quite well, but has to be hand sewed. I wasn't feeling that generous with my time so as to want to make too many more like that!

So I went back to some of the blogs where I had seen different balloon ball patterns, and gave three different ones a try. I made four balls from three different patterns.

As a disclaimer, I was being quick and slapdash about this project. I had a deadline, not a lot of free time, and needed to get them done. I didn't spend a lot of time getting my seam allowances accurate and lining up all the corners. Obviously, all these patterns will make nicer balls if you pay more attention than I did to what you're doing!

Warning: Always supervise small children playing with balloons, even if they are tucked into fabric balls, due to the risk of choking if they get any of the rubber in their mouths.

1. First there's this one from Stuff by Steph.


It has eight sides and an octagonal end piece. According to the pattern, you should put a buttonhole in one end piece, I just left one small side seam open. This did leave an opening that was visible, so you need to be really careful to tuck in the balloon end, so the child can't get at it.

This pattern was really fiddly. The end pieces are really small and the seams joining them to the sides are hard to get into. I had to hand-sew on the end pieces. But it made quite a nice little ball.

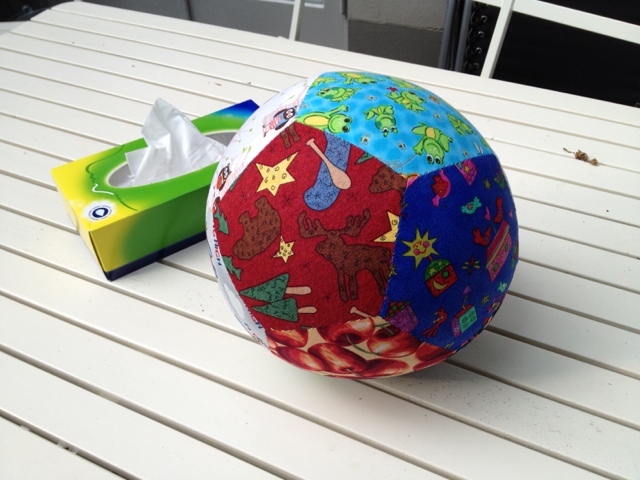
2. Next was this pattern from Purlbee.

I made two balls from this pattern, in slightly different sizes. (Sorry - I don't remember which of her "sizes" I picked, and in any case, I adjusted the size on my printer, so they don't match any of her sizes exactly).

This pattern was easier than the first, above, because I could machine sew all my seams. Not being particularly careful on this day, the ends don't quite meet up. This is sloppy sewing on my part, not the fault of the pattern. Especially because the pattern provides for covering the ends with small circles, which I didn't do (leaving my faults open for the world to see...). 

To make an entry point for the balloons, I made one side piece out of two, overlapping pieces, with small turn-under seams. (See the second picture of the ball with pink on it). I didn't get this quite right, so the opening gapes a little. Again - you need to be careful to tuck in the balloon carefully so the child doesn't pull it out.


3. The last was this pattern from Emma Jones.

This is a five-sided ball, with pentagon ends. I machine sewed the lot, which was interesting around the pentagons.

Again - being in a hurry, I was not very careful with my seam allowances. This ball showed my hap-hazardness most. Between wonky pentagons on the ends, and balloons that blow up pear-shaped not really round, this was one odd-shaped ball! But hopefully the recipient doesn't mind too much.


So. There were some extras for my nieces and nephews for christmas, light-weight, non-breakable and therefore cheap and easy to post. I haven't actually had any feedback, so I'm taking it that no news is good news!

Daycare fabric box and bag

Daycare fabric box and bag


(Note: I drafted this post back in September [2012]. Everything but putting the pictures into the right places. And then went back to work. And it has been sitting here in draft form ever since... But here it is, a little out of date with it's time references, but here nevertheless).

My little boy has just started daycare, and all the children have a shelf to keep their spare clothes and other bits and pieces on. I wanted to make him a fabric box that was personalised, and would keep all his things together (as much as possible...).

Being me, this supposedly simple project got more and more complicated as time went on. Having bought the wrong size zip, I decided to use that to make an expandable bag, matching the box, to carry the things we need to take back and forth each day. Somewhere to put all the things that "we need to remember to take to daycare tomorrow". And that project went from simple to complicated, in the way that things do...

Anyway, I finally finished them! Just in time as I have to go back to work on Monday. Not sure how I feel about that, these months of maternity leave have been lovely.

I was going to note how I made these, and maybe put up a tutorial for others. For the box, all I can say to anyone else who wants to make one like this is: DON'T! Or at least not the way I did. It was really fiddly and much more complicated that I had imagined. I'm really happy with the result, but I won't be making another any time soon! For the bag... the progress photos didn't happen, and I'm not sure I can be bothered writing up all the directions. If a few people ask for it I might reconsider, but in the meantime, they are finished to be admired. :)  [NOTE January 2013: It's been so long now, I don't think I can remember how I made it. So no tutorial will be available I'm afraid.]

Here is the box. It is fully fabric lined, and the original (unphotoshopped) version has my son's name appliqued on the lid. At least the short form, his whole name has too many letters!


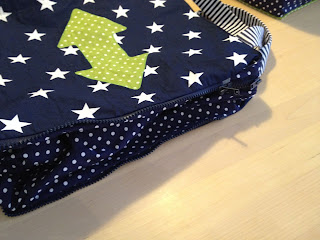
Here is the bag. All zipped up it looks like this:


Inside it looks like this, with one inside zip pocket.


And the probably-totally-unnecessary-added-complication element is that if you unzip around the three outer sides, it expands to a bigger bag!


One daycare storage box, and one back-and-forth bag.


Monday, 11 June 2012

Balloon Ball from Pentagons

I finished my balloon ball from this post, and it's a big hit in our house with both big and little kids!


How to make this:

  1. Print 12 pentagons on normal printer paper and cut them out.
    1. You can make pentagons in Microsoft Word. It is under Insert --> Picture --> Autoshapes.
    2. Figure out how big you want your ball to be, and divide that measurement by 2.6. That will be the length of each side on your pentagons. Times this by 1.6 to find the width of your whole pentagon. (My pentagons were about 8.5cm along each side, 13.25cm wide, and my finished ball is about 22cm across.)
    3. Insert a pentagon and then make the pentagon as wide as the width you calculated above. Let Microsoft Word adjust the height proportionally.
  2. For eleven of the pentagons, place the paper on your fabric and cut roughly 1 - 1 1/2 cm outside the paper piece. (I used my roller cutter.)
  3. For each of these 11 pieces, place a paper pentagon against the wrong side of the fabric, and carefully fold the fabric seam allowance over the paper, making a sharp fold and keeping the fabric quite tight against the paper. Using a contrast colour thread, being careful to keep the paper centred in the fabric, hand baste (sew with big running stitches) about 5mm in from the edge, around all five sides. Now you should have eleven pentagons of fabric the same size as your paper pieces, with paper still inside.
  4. For the twelth pentagon, you need two pieces of fabric, each the full width of the pentagon plus seam allowances and about 2/3 the height of the pentagon plus seam allowances. In my case, with pentagons about 13.25cm wide, I needed two pieces each about 15.5 cm x 11cm. Take one long edge of each piece and turn about 1cm towards the wrong side, then fold over again; making a hem roughly 1cm wide. Sew along the hem. I hand sewed this with small running stitch, but you could just as easily machine sew it.
  5. Lay your two hemmed pieces of fabric right sides down next to each other, hem-to-hem, then overlap the two hemmed edges by about 3 cm, maybe a little less. Sew two seams at right-angles to the hemmed edges, joining the two overlapping pieces, from hem to hem, about 4-5 cm apart.
  6. Set your last paper pentagon over the two overlapping fabrics and pin, then baste as you did with the other eleven, folding the seam allowance around the paper.
  7. You should now have twelve fabric pentagons with paper sewn in.
  8. Load up a needle and thread with a matching thread. I used a variegated thread with my multi-coloured fabric, but anything that's not going to clash too badly is fine. It's better to match your thread to darker colours rather than lighter, if you want it to blend as much as possible. I used doubled thread; if this ball breaks it will because the fabric gives out, not because my sewing does!
  9. Take two pentagons and place right sides together. Then sew a ladder stitch seam to join the two pentagons along one edge. (For a quick run through on some options for different stitches and some pictures showing what the stitches look like, see the Sometimes Crafter here.) I tied off my sewing at every corner. This is possibly not necessary, but I wanted it to be easy to mend, if any sewing did start to come undone.
  10. Continue joining your pentagons in this pattern:


    (image from Wikipedia)

    It should look something like this:

  11. Join all the edges together. You do not need to leave any gaps for turning. When you've finished, it should look something like this:
  12. Carefully draw out all your basting threads and remove the paper pieces.
  13. Turn it inside out, through the gap between your overlapping piece.
  14. (This is where I though I was finished, but I realised that the overlapped pentagon was too wide, and the opening too big. So I sewed the seams described in paragraph 5 above now.)
  15. And here you have the finished product!
  16. Insert a balloon through the opening (with the mouth piece still outside) and inflate. You can just twist the balloon and tuck the end into the fabric ball. This makes it easy to deflate again and reuse the balloon, but it won't stay up for long. Otherwise tie off the balloon properly and tuck the end away inside.
Voila! One lightweight, kid friendly, furniture friendly, ball!
    Note: while they are lightweight, these balloon balls still fly pretty well. Don't smash at people, expecting them to slowly float across the room like a normal balloon! Not that I speak from experience or anything...

    Now that's it done, I do have a few "if I knew then what I know now" points.

    • Firstly, the overlap is too big on this size pentagons, as I've said above. I only figured this out after the fact, so I've included instructions to make it a bit smaller before sewing up your overlapping pentagon. I didn't fix that until after I was otherwise finished.
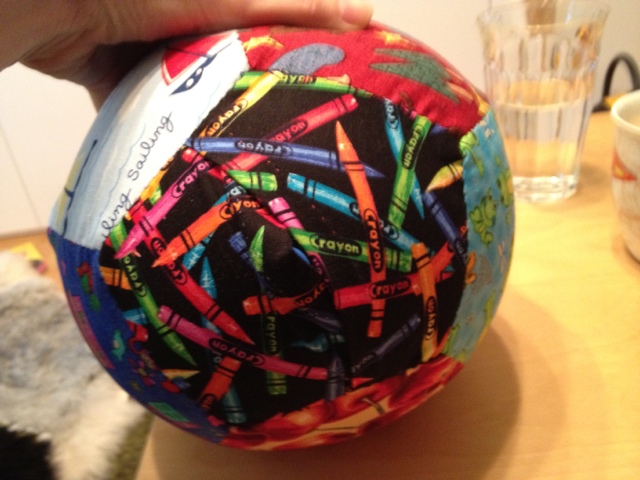
    • This ball is quite big. I think my little man will appreciate one slightly smaller, so I'm planning on making him a smaller one, and any extras I ever make for gifts will be a bit smaller.
    • For my toddler, it's quite hard to grab this ball. So my next model for him will include some grab loops along a couple of the seams.
    • It seems this is a popular toy indoors and outdoors. So his next version will not be made from quilting cotton fabrics, but rather some upholstery fabric samples I have lying around. This will be an outside version.

    Thursday, 29 March 2012

    International I-Spy charm swap


    I've seen a few swaps organised online for fabric squares to make an I-Spy quilt. I really want to make my son an I-Spy quilt, and I really don't want to buy the minimum cut of all the different fabrics I'll need! I haven't managed to find any swaps that are a) open now, or b) open to non-US residents, so I thought I'd organise my own.

    UPDATE: Our swap is now full. I can't wait to see what everyone sends in!

    If you are interested in doing an I-spy swap, post your email address in the comments field, or send me a private email. If we get enough people interested, I will organise another swap.

    What's an I-Spy quilt?
    An I-Spy quilt is a patchwork with many different fabrics showing many different objects. Kids can be given a list or small cards naming everything on the quilt. They then search the quilt to find the different items. They are great for keeping kids entertained: outdoors, in the car, or anywhere really.

    What's this?
    So here it is: an international swap for I-Spy charm squares (12,5 cm or 5 inch squares), open for sign up as of 1 April 2012. Fabric to be posted to arrive in Sweden no later than 15 May 2012. I'll get them all back in the post by 31 May. When you get it will depend on where you are.

    Fabric
    This swap is for I-Spy fabrics, that means small images of things that a child can name. Things like cats, strawberies, playing cards, ladybirds, dinosaurs, soccer balls, drums, frogs, pirates, dragonflies, boats, suitcases, fairies, zebras, buses, etc etc.

    The images also need to be small enough that every square you send has the item in an identifiable form. It's no good sending a fabric that has a big image, so one square has the head, and the other squares all have abstract looking back legs. So please send small prints that look good on a charm square.

    No solids, dots, or abstract patterns. Floral prints are no good, specific flowers are ok - such as "daisies" or "tulips" (but not too many so avoid if you can).

    Please: no licensed images (sports teams, Disney characters, etc).

    The fabrics should be good quality cotton patchwork fabric, new, unwashed, from a smoke-free home.

    Format and number
    Each fabric square you send in should be 12,5 cm (5 inches) square. Please be very careful when cutting to ensure that your pieces are this size. There are good instructions for cutting charm squares on Elizabeth Hartman's blog post here. You will need 16 charm squares from each of 5 fabrics. If you're really careful, you should be able to get that from 25 cm full width, or from a fat quarter. If in doubt, buy extra to be on the safe side!

    So you send me 80 squares and you will get back 80 squares; 5 of which you sent, the other 75 new! (I know you ought to be able to keep your own fabrics, but then I have to keep track of who sent what, so it'll be way easier for me if you send me all 16 pieces, and you'll get back squares of the fabric you sent in as well.)
    If you can group your fabric, that would be appreciated. Place one of each of your five fabrics in a small pile together, before bundling them all up to post to me.

    Packaging and payment
    Put all your charm squares into a small plastic bag (eg ziploc), together with a card showing your name, email address and postal address. Please type all names and addresses, no hand written cards! Post it to the address I will email to you with acceptance of your sign-up to the swap.

    Then pay for your return postage into my Paypal account. Details will also be in your acceptance email.
    UPDATE:Postage to addresses in Sweden will cost 50 SEK. Anywhere else in the world: 90 SEK (roughly 10.5 EUR or 13.5 USD.) This includes a padded envelope that I will buy. If you take more than one slot, you can get up to three sets of 80 charms into the same envelope, same postage cost.

    Sign-up
    This swap is now full, and it is not possible to sign up. If you are interested in doing an I-spy swap, post your email address in the comments field, or send me a private email. If we get enough people interested, I will organise another swap.

    New baby change bag

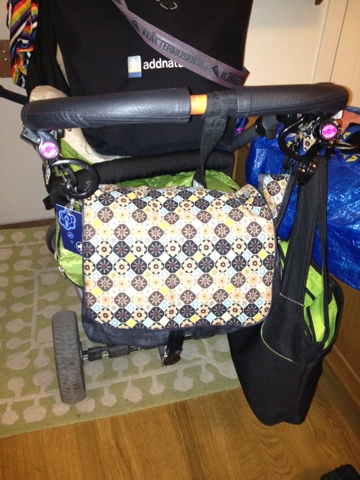
    A few weeks ago I finished our new change bag. I think it is way nicer than anything I've seen available to buy.


    I followed a pattern by Åsa Sandblad (in Swedish) that I bought at Tyger och Ting, where I also got the fabric; but of course since I'm incapable of just following a pattern, I adjusted it a bit.

    My version is one and a half times as wide as the original, and has only three fabrics, instead of the suggested four.

    The pattern doesn't specify how to make the internal pockets; I put in one zip pocket across the whole width on the back lining. I thought about (tried) a patch pocket inside the flap, but since I'm not capable of making a good looking patch pocket with no open edges inside, I gave up that idea.


    I put a loop inside one side seam of the lining that I can hook my keys on, and a clip buckle to hold down the flap (as it's always overfull).


    I also put in loops on the top seam outside the shoulder strap, and made extra straps to hold it to the pram handles.


    When I was done I whipped up a couple of pouches for inside, with the fabric I had left over.


    They've each got two zip pockets; I use one for nappy change things and the other has a change of clothes, some emergency toys and the pegs I use to hold blankets over the pram.


    Overall I'm really happy with this new bag. It is a bit small to fit in everything I need to take with me. I can squeeze in a bit of food, but for a long day needing several meals and snacks, I need a separate bag for my LO's food.


    And it's not remotely waterproof, which is really tempting fate. I wonder if there is any spray I can use to make it slightly more water repellent?

    If I were to start again, knowing then what I know now, I would probably make it a smidgeon bigger, in all directions. I would definitely make the side pocket bigger, as that's too narrow for any sort of bottle, and not very useful as it is now. I would put the clip buckle in as I was making the flap/outer, instead of sewing it on after the fact, and I would put much more reinforcing in the loops that it hangs from on the pram. So far they're holding, but they are pretty thin and might not last as long as I hope they will.

    So there you have it. Our one-of-a-kind change bag.


    P.S. There's a picture of the original design on this blog post.